How to send NFC passes from GoHighLevel

Updated March 23, 2026
TL;DR: Add custom integration to Go High Level.
- 1. Trigger a workflow.
- 2. Add a Custom Code POST request to PassNinja.
- 3. Copy/paste the HTTP endpoint and parameters.
- 4. Retrieve the pass install URL.
- 5. SMS or Email it so users can download their pass.
No-code platforms like GoHighLevel.com allow you to build automated workflows without writing traditional code. In some cases, you may need to integrate with an external API like PassNinja to generate and deliver digital wallet passes. This tutorial explains how to set up a workflow that uses the Custom Code action to send a POST request to the PassNinja REST API, create a pass, capture the landing URL, and send it to the user via email.
How to create a trigger and add custom code action
Every workflow in Go High Level begins with a trigger, which is the event that starts the automation. This could be a form submission, a tag being added to a contact, an appointment booking, or any other supported event. For this tutorial, the specific trigger is out of scope, but you must have one configured before you can add the custom code step.

- Once your trigger is set:
- Click the "+" icon to add a new Action to your workflow.
- From the list of available actions, select Custom Code.
- Inside the Custom Code setup, choose HTTP Request as the action type.
- Set the Method to POST.
- There are two main approaches:
- Write your own code directly in the editor for full control, but more manual work.
- Easiest method: copy the snippet of code provided in Step 2. This lets you send data to the PassNinja API without writing any boilerplate code yourself.
How to use the PassNinja POST code
The easiest way to integrate with PassNinja is to paste a ready-to-use snippet into your Custom Code step. This snippet sends a POST request to create a pass.
// Make sure you get the proper values from the pass template Getting Started tab
const url = "https://api.passninja.com/v1/passes";
const api_key = "YOUR_API_KEY"; // from PassNinja dashboard
const account_id = "YOUR_ACCOUNT_ID"; // from PassNinja dashboard
const pass_template_id = "YOUR_TEMPLATE_ID"; // from PassNinja dashboard
//Define API fields from the template, make sure you get them all here
const nfc = "https://www.passninja.com"; // example nfc value


const headers = {
  'X-API-KEY': api_key,
  'X-ACCOUNT-ID': account_id,
  'Content-Type': 'application/json'
};

const data = {
  passTemplate: pass_template_id,
  pass: {
    ///add your API fields from the Template
    "nfc.message": nfc,
  }
};

// Send POST request to PassNinja API
const postResponse = await customRequest.post(url, { data, headers });

// Output for later workflow steps
output = {
  status: postResponse.status,
  data: postResponse.data
};
Note: In the arguments, make sure you include all the fields that are controlled by the API for your specific pass template. You can find these fields in the template creation section of your PassNinja dashboard.
Once in the Custom Code block, you can modify or add your extra fields as needed. Make sure to put in your api_key, account_id, and pass_template_id from your PassNinja template dashboard. It should look something like this:
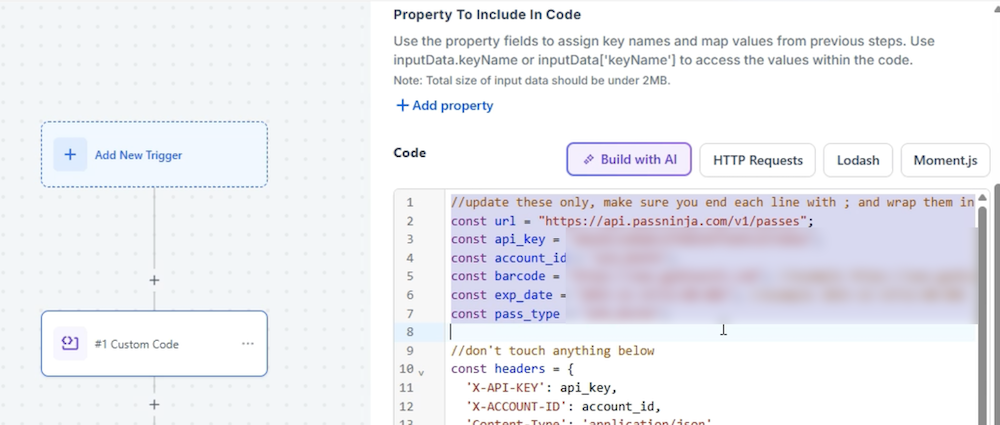
This code sets up the request URL and authentication headers but you have to wire up the payload parameters. So for instance, if you started with a Create Contact trigger, then you would have the {{contact.name}} and {{contact.phone}} of a contact after it's created. You can then set those variables as the fields in the pass you'll create with PassNinja with the inputData object. See it outlined in red here:

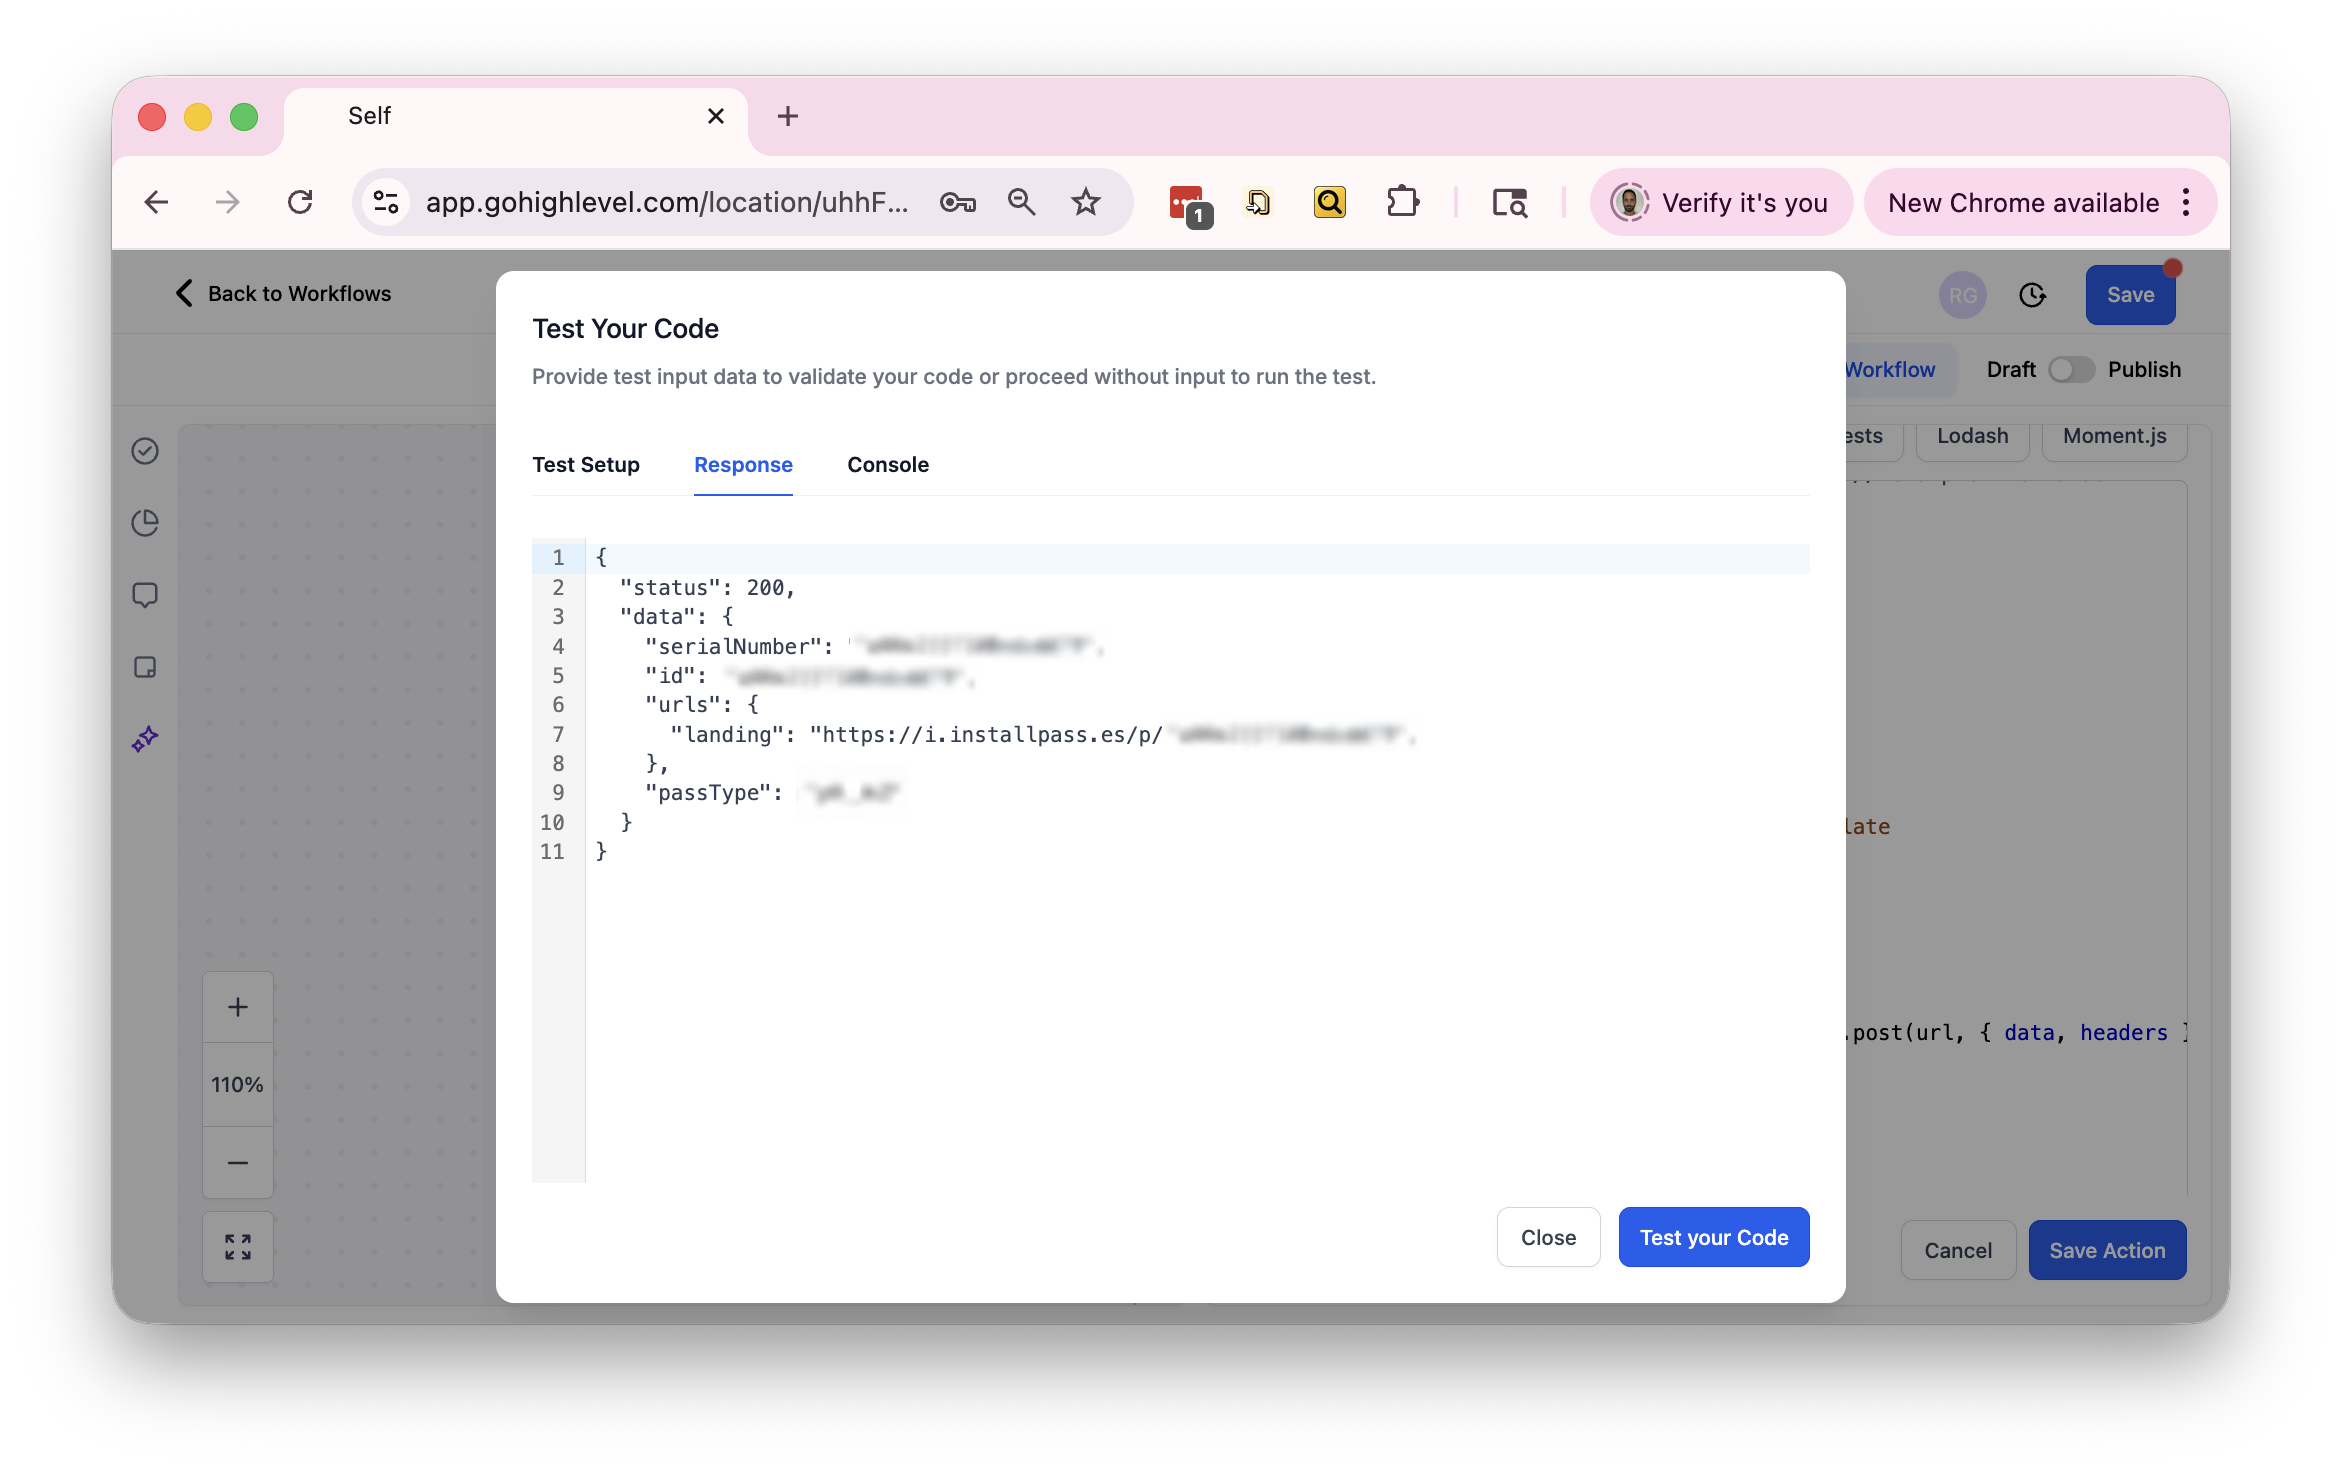
With that in place, you can click the "Test your code" button to send the request using customRequest.post. The response shown is what will be stored in the output object for the later workflow steps to use.
How do you access the landing URL in later steps
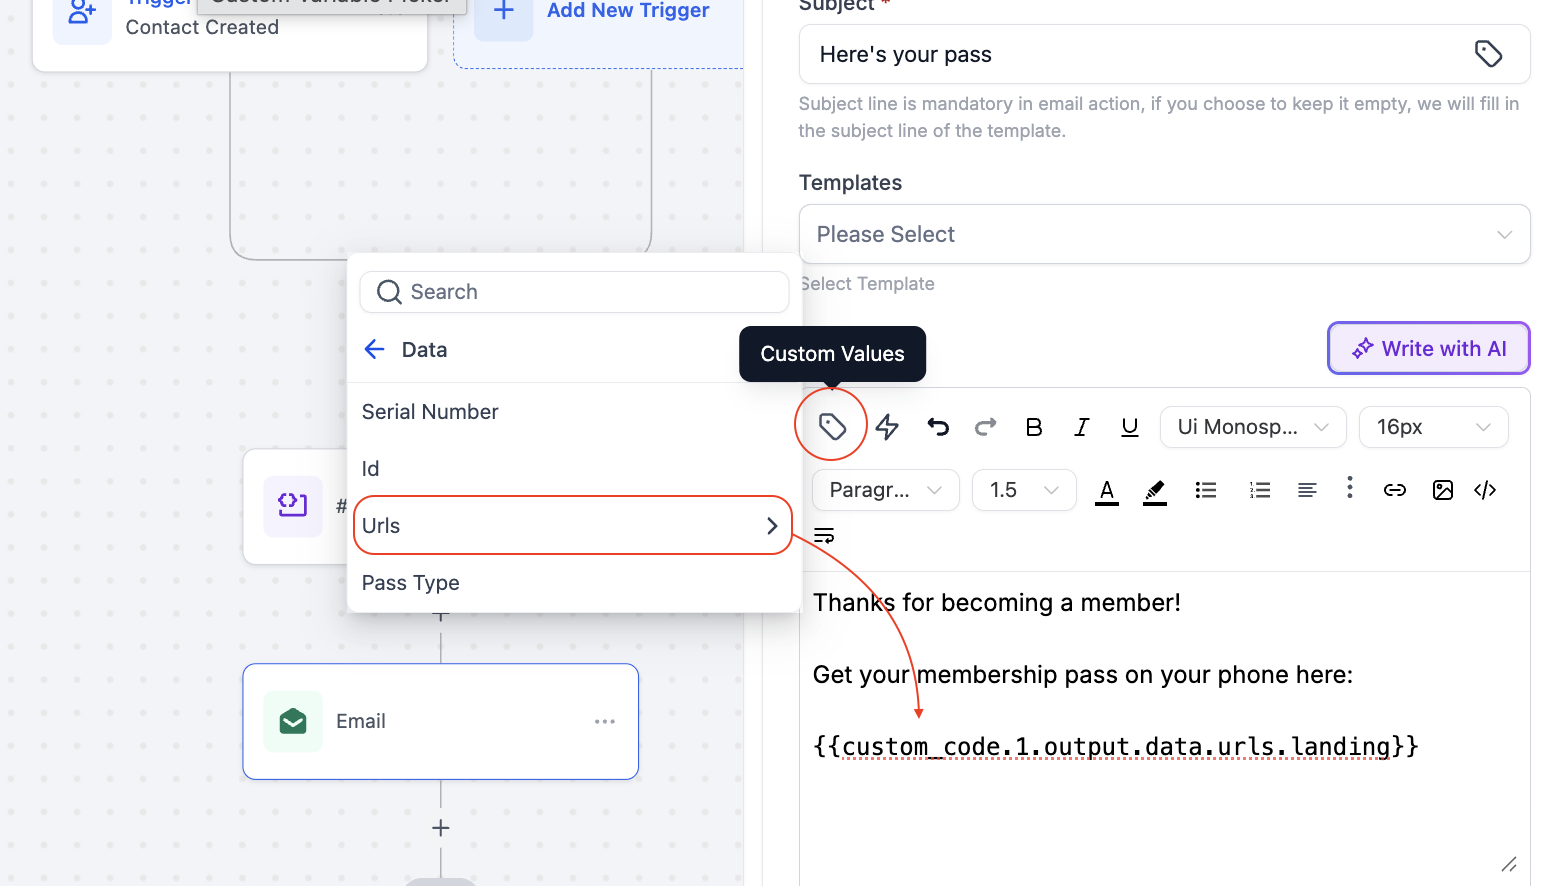
When the PassNinja API creates a pass, it returns a JSON response that includes a urls.landing property. This is the direct link to install the pass in Apple Wallet or Google Wallet. You can reference it in Go High Level using a merge field like {{custom_code.1.output.data.urls.landing}}.
To insert this value into a later step, such as an SMS or email, click into the message body and open the Custom Values menu. Navigate to Custom Code, select your Custom Code step (for example, custom_code.1), then choose output, data, urls, and landing. Clicking this will insert the correct merge field automatically. This ensures you are using the exact URL returned by the API for that specific pass.
How do you test the integration and send the pass link by email
After setting up your Custom Code step, you should test the entire workflow to ensure it works as expected. In the Custom Code editor, click Test Code and provide sample values for your parameters such as barcode and expiration date. Check the console output for any errors and confirm that the output.data.urls.landing value is present.
Next, add an Email action immediately after your Custom Code step. In the email body, include a message and insert the pass download link using the merge field {{custom_code.1.output.data.urls.landing}}. This will send each recipient their unique pass link. Depending on your platform, you can manually enroll a contact into the workflow to trigger the email or use a test contact with your own email address. Open the received email and click the link to confirm it opens the pass install page. Verify that the pass installs correctly on Apple Wallet or Google Wallet and that the email formatting is clean and the link is clickable.
Making NFC easy with PassNinja
PassNinja simplifies the process of creating and distributing NFC-enabled wallet passes by providing a consistent API and dashboard. By integrating directly into a no-code platform like Go High Level, you can automate the creation and delivery of passes without building a custom backend. This approach allows you to leverage NFC technology for loyalty programs, event tickets, or access control with minimal development effort.
Using the Custom Code action with PassNinja's REST API means you can dynamically populate pass fields, control expiration dates, and deliver installation links instantly. This flexibility makes it possible to adapt your passes to different campaigns or user segments while maintaining a seamless user experience.
Conclusion
Integrating PassNinja into Go High Level using the Custom Code action is a straightforward way to automate pass creation and delivery. Starting with a trigger, adding a POST request to the PassNinja API, retrieving the landing URL, and sending it via email ensures users receive their passes quickly and reliably. By following the steps outlined here, you can enhance your workflows with NFC-enabled passes and provide a modern, convenient experience for your audience.