How to Build an NFC Car Key

Updated September 18, 2024
Overview
This guide will show you how to replace your car keys with an NFC-enabled pass in your Apple or Google Wallet. Not only will this free you from having to carry car keys but it allows you to grant (and revoke) access to others by simply sharing a pass. We're going to go step by step. First, we'll go through the technologies at play and how we're using them. Then, we'll build out each component in detail so you're confident in doing this yourself. Here's a quick summary of what we'll get done:
You will need:
- iPhone, Apple Watch, or Android with NFC functionality (user provided)
- Car Key with keyless entry feature (user provided)
Note: To hack into electronics you'll need some basic tools.
Why NFC for Car Access?
NFC technology is ideal for access control due to its convenience, cryptography, and proof of presence. Mobile wallets and NFC have become the ultimate solutions for securely and quickly accessing vehicles without the need for a physical key. NFC-enabled wallet passes are especially practical since they can carry access rights embedded within their encrypted data, freeing the system from having to be cloud-connected to check for permissions.
Beyond convenience, wallet passes provide an extra layer of security since they are cryptographically signed and can require biometric or pin entry before being scannable by an NFC reader, essentially enforcing multi-factor authentication with just a tap. This makes wallet passes with NFC an ideal choice for keyless entry systems.
Getting a Wallet Pass with NFC
The Apple and Google Wallets support different types of NFC cards including payment (Contactless EMV), transit (Mifare Plus), secure access (Mifare DESFire), and value added services (VAS). Issuing any of these card types for users to install in their mobile wallets involves a series of steps from designing the look and feel of the card to registering as a commercial partner with Apple and Google to following specifications and integrating a bunch of APIs.

Apple and Google each require a lengthy workflow for creating VAS passes as shown above. Each pass will have a unique identifier and encryption key that pair up with what goes in the NFC readers meant to scan them. So start by getting your Pass Type ID for Apple or your Collector and Issuer IDs for Google. Then create a valid pass, with the NFC value in the correct field and get it installed on your mobile device. Once you have that installed, you'll need to setup your NFC reader to read it. The reader and pass will now work as lock and key, respectively. Let's integrate them with the car remote next!
Car Remote Teardown
Note: Make sure you have a spare of your car's keyless entry remote before attempting this hack. The modification may vary from manufacturer to manufacturer so in the unlikely case you damage the electronics in the remote, you may need the spare to operate your vehicle. Make sure to do the proper research on your situation before proceeding.
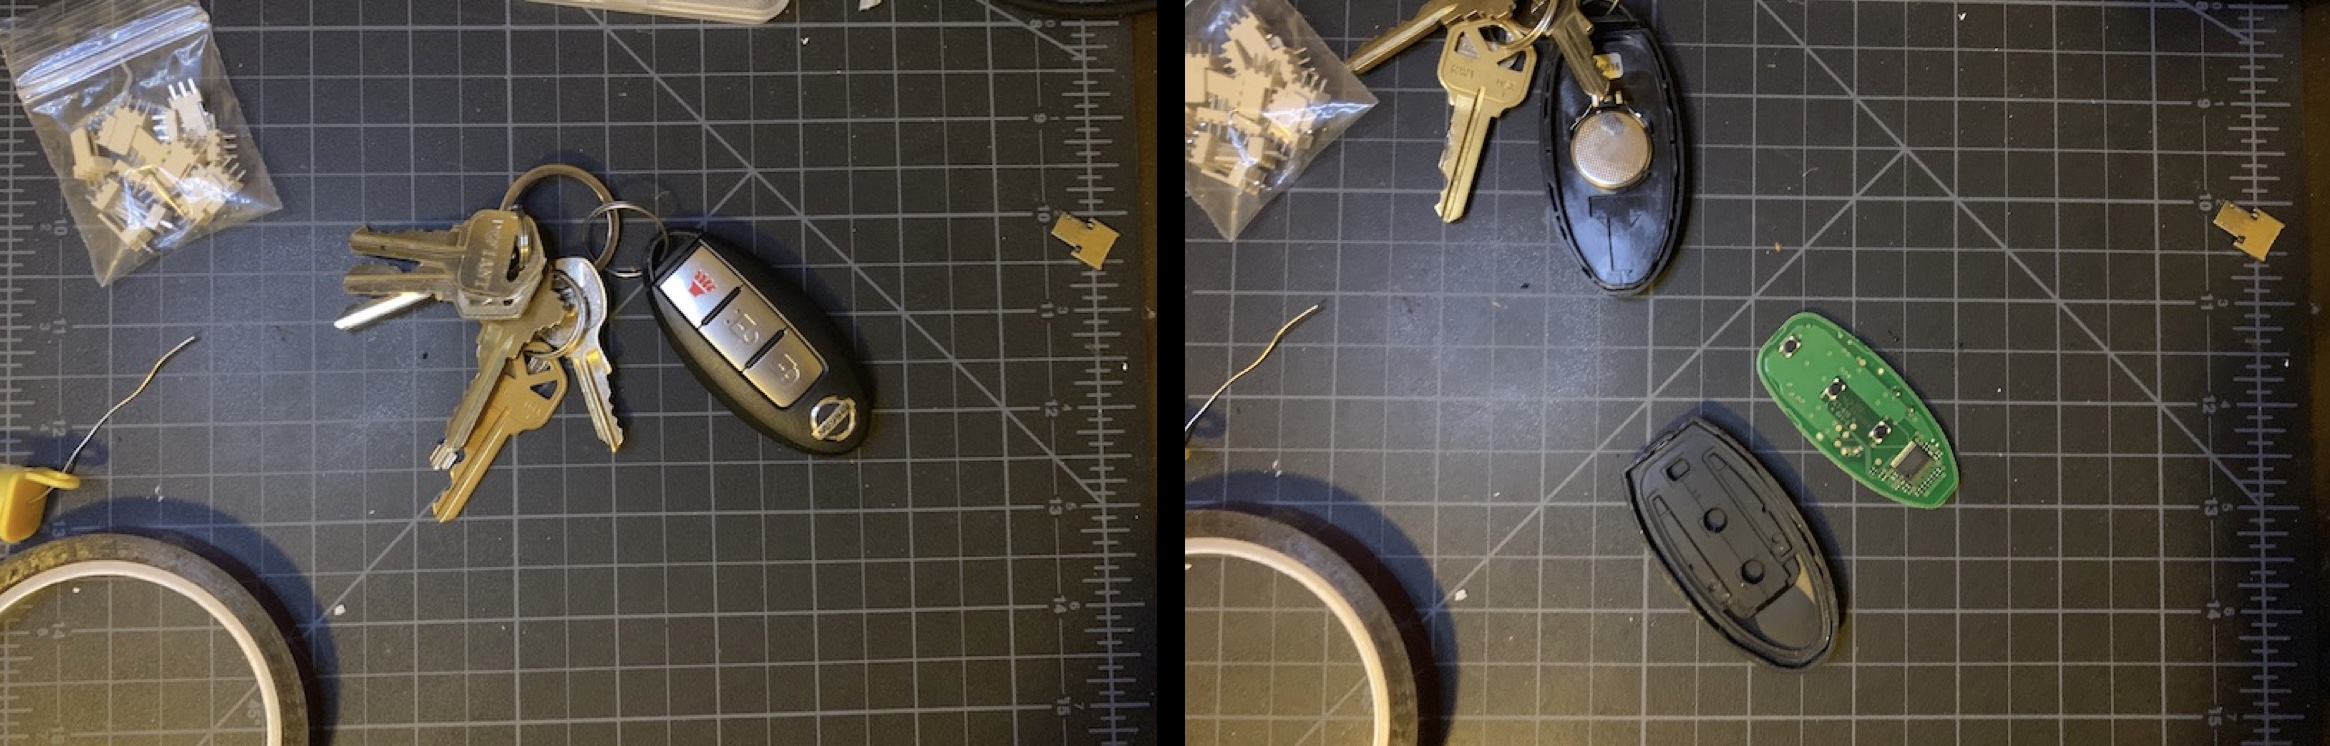
Taking apart your car's keyless entry remote should be easy since they are often designed to unsnap to replace the battery. Make sure to check your car's user manual for more details on this. In our case, the Nissan Juke key has a groove to wedge in a flat head screwdriver and pop off the case. This reveals the printed circuit board (PCB) with push buttons and battery holster.
Wire Tap into Remote Buttons
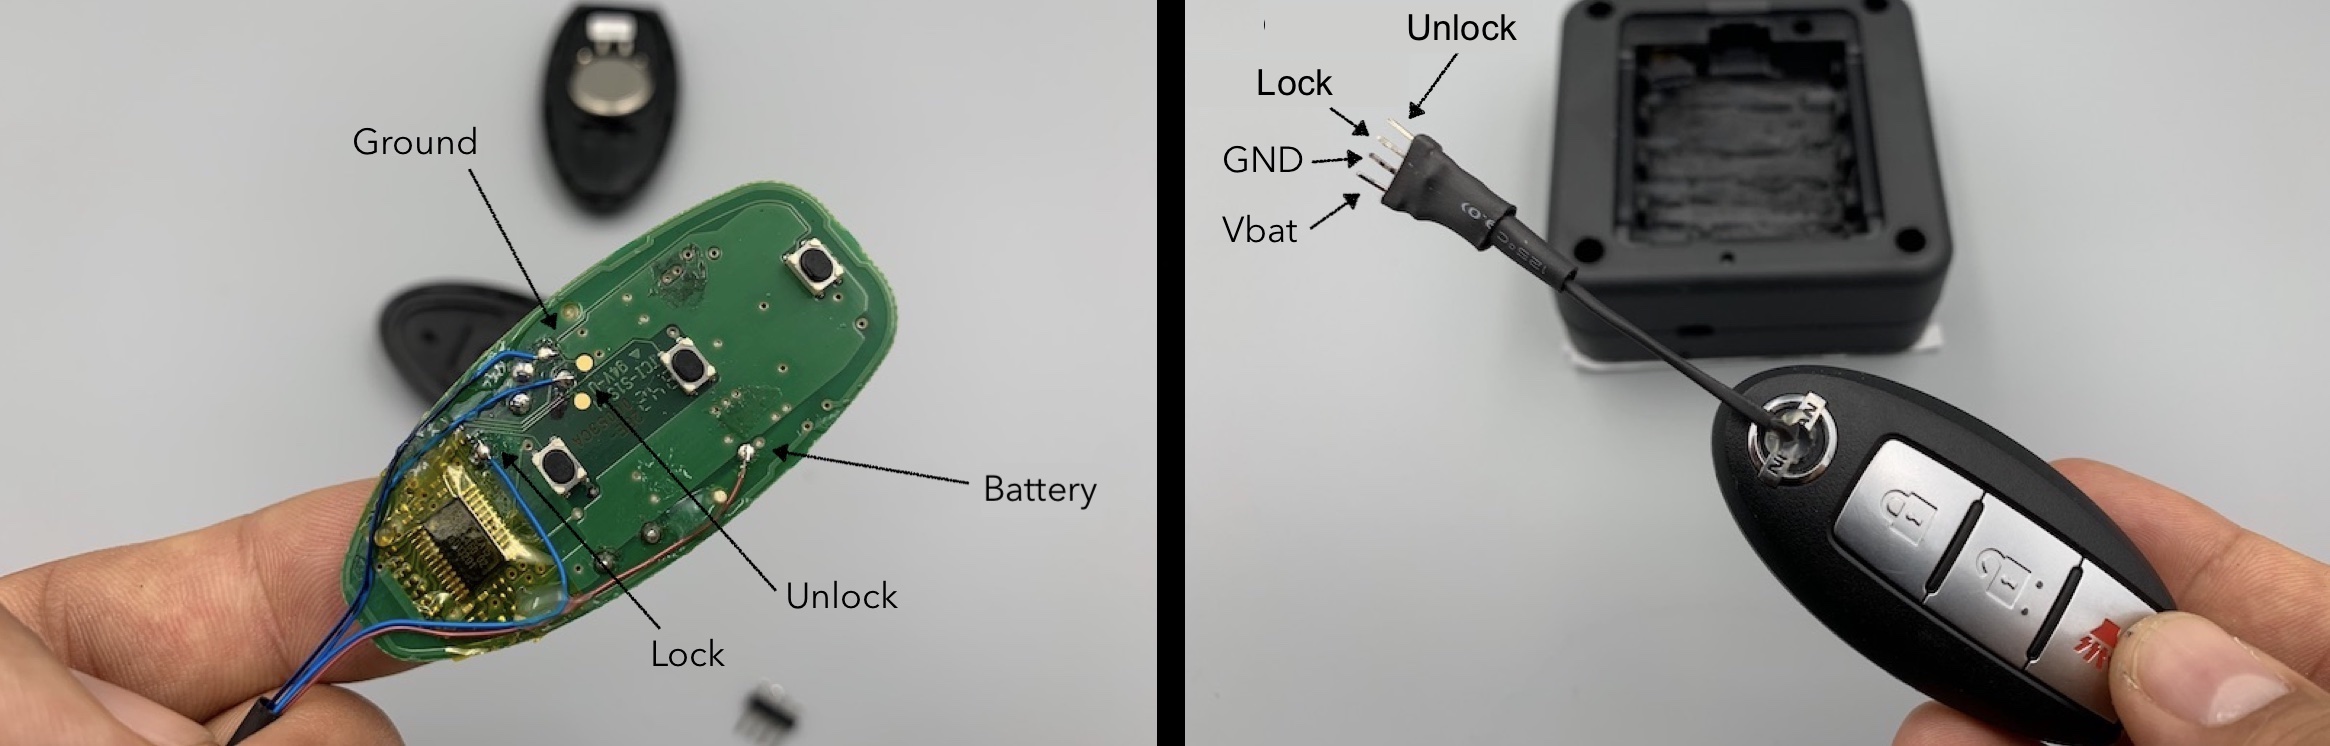
Push button remotes are pretty straight forward consisting of a battery, a few buttons, and a controller. The controller senses when the buttons are pressed since they cause a voltage change. In order to simulate button presses we will need to solder wire taps onto each button line (eg Lock, Unlock, etc.) that feeds into the controller. We'll also tap into the Battery (+) and Ground (-) lines by following traces out from the battery holster and soldering at the thickest points.
Depending on the design, buttons can be setup as active high or active low. You can use your Digital Multimeter (in DC votlage mode) to probe the button lines while pressing them (with battery in place) to determine if voltage swings high or low. This will be needed for coding your lock and unlock routines.
Control Buttons from Raspberry Pi
The Raspberry Pi has a 40 pin header with 26 General Purpose Input/Output (GPIO) pins. Since the keyless remote is independently powered, you may need a relay to connect it to the Raspberry Pi and avoid any malfunctions. Ultimately though, the Unlock line should connect to pin07 (4th row) and the Lock line to pin09 (5th row). You can use a simple connector in between so you can unplug the car key from the Raspberry Pi later, if needed. The last part is to power it all up from a power bank or another capable power supply.
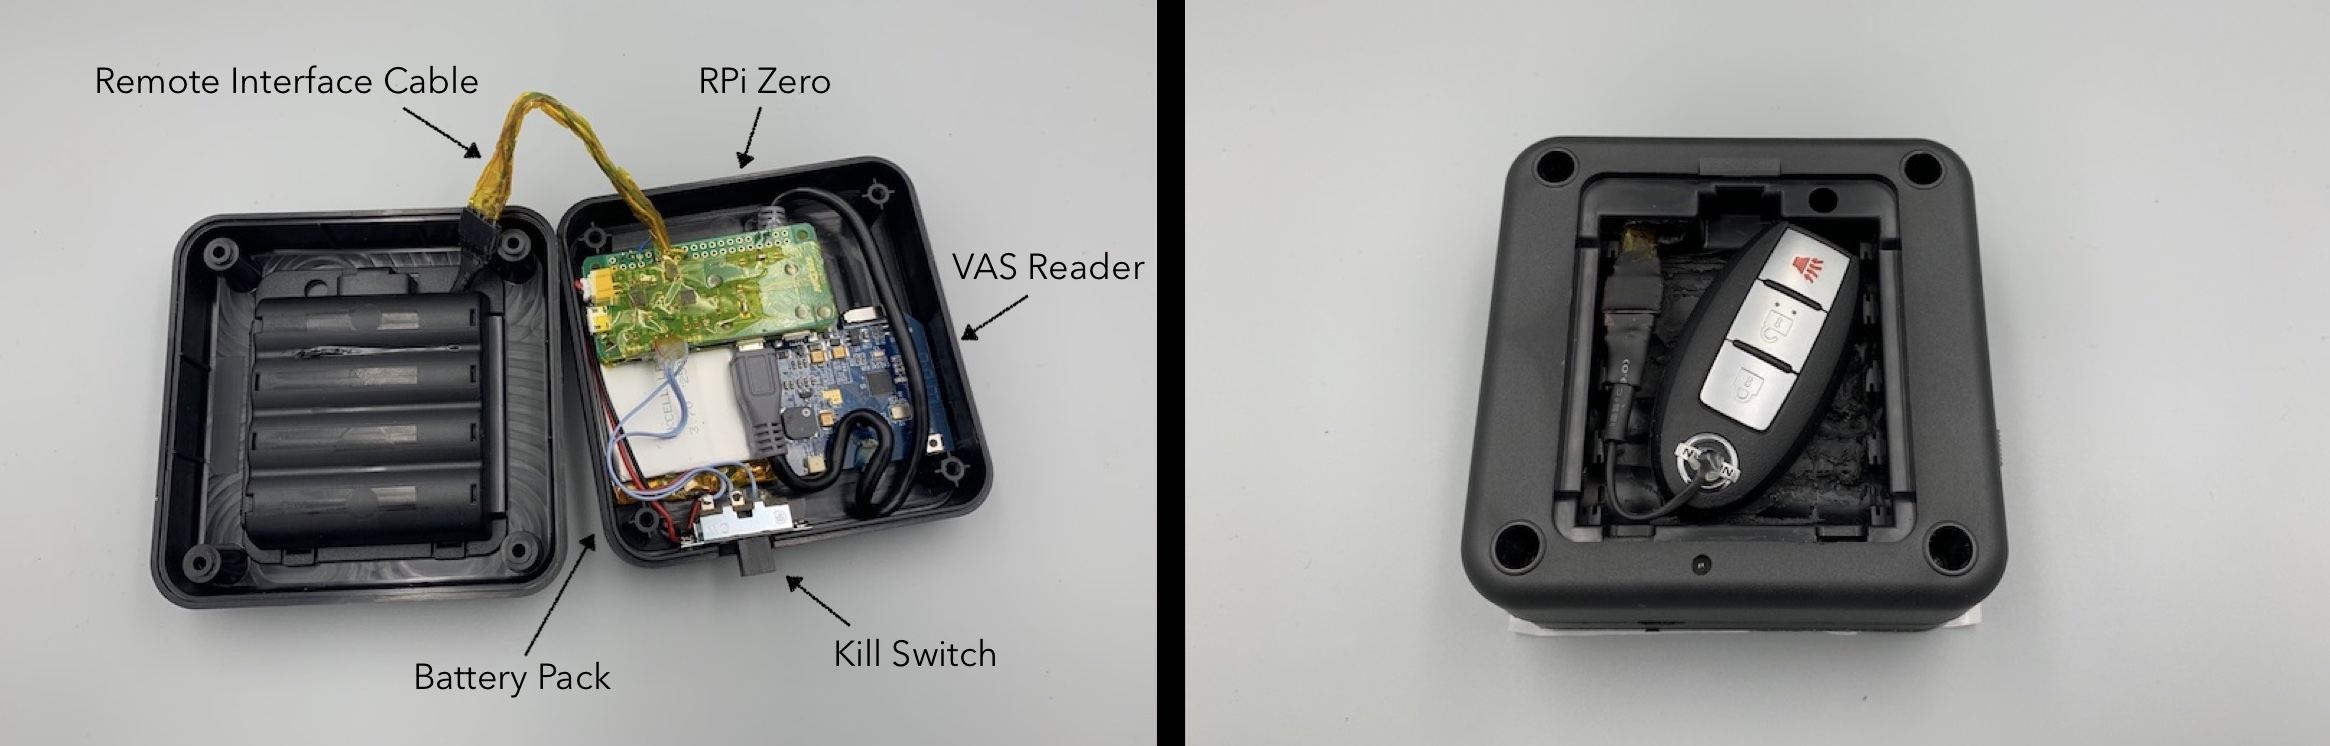
Note: We opted for a more compact design using a Raspberry Pi Zero, a JuiceboxZero shield and a 2500mAh LiPo battery. The Raspberry Pi connects to the keyless remote via the GPIO cable, to the VAS reader over USB, and is powered by the JuiceBoxZero+LiPo Battery over the 40-pin header. Arranging things nicely lets it all fit in an enclosure like this one.
Scripting Car Door Unlock with NFC
To control our keyless remote, we'll need to setup the Raspberry Pi with some software. In brief, we'll use Python that comes preinstalled with the Raspberry Pi OS. We'll add onto that the CircuitPython and Blinka libraries to control the Pi's 40 pin header like so:
- Make sure you have the latest Raspberry Pi OS (Bullseye) and Python 3.7 (or later) installed.
- Install Blinka wrapper
- Install CircuitPython Libraries
With this software in place, let's write a python script in your root directory to control the keyless remote. The script should start by initializing the hardware with GPIO7 and GPIO9 set to output. Then, it should wait for a valid pass to be scanned. If successful, it should unlock the car doors, wait for 10 seconds, and lock them back up again. This will give enough time to enter the vehicle, while preventing cases where the car may be left unlocked. Here's what this looks like:
# need to include the libraries we'll use
import time
import board
import digitalio

# simple greeting to make sure we're running
print("hello ninja!\n")

# here we initialize GPIO7 and GPIO9 and set it to OUTPUT
unlock = digitalio.DigitalInOut(board.D7)
lock = digitalio.DigitalInOut(board.D9)
unlock.direction = digitalio.Direction.OUTPUT
lock.direction = digitalio.Direction.OUTPUT
access = True if (input("Scan now:\n") == "your pass nfc message") else False  # grab keyboard input and validate

# here we loop if access is True
while access:
  unlock.value = False  # set UNLOCK line to LOW (unlock button pressed)
  time.sleep(0.5)       # wait half a second
  unlock.value = True   # set UNLOCK line to HIGH (unlock button released)
  time.sleep(10)        # wait 10 seconds
  lock.value = False    # set LOCK line to LOW (lock button pressed)
  time.sleep(0.5)       # wait half a second
  lock.value = True     # set LOCK line to HIGH (lock button released)
  access = True if (input("Scan now:\n") == "your pass nfc message") else False  # grab keyboard input and validate
You will need to update the last line of code so that string "your pass nfc message" is actually the value you want to validate. This should match the value of the NFC message key for Apple Wallet passes OR smartTapRedemptionValue for Google Pay passes.
Now that we have NFC control of the car doors, we'll need to place the NFC reader somewhere safe and accessbile. That's next!
Mounting NFC Reader in the Car
Before mounting, you'll need to configure your VAS reader with your private keys. You can read about how to do that in this guide. If you do not load your private keys or they are loaded incorrectly, then your script from the section above will not work.
If you need private keys, you can find them in your PassNinja console on the config page for any given pass template.
NFC readers have a range of roughly 2 inches through non-conductive material. Given this aspect, the most practical placement of the NFC reader unit is behind the windshield. This also allows the power bank to be wired into the car's accessory power supply for recharging while driving.
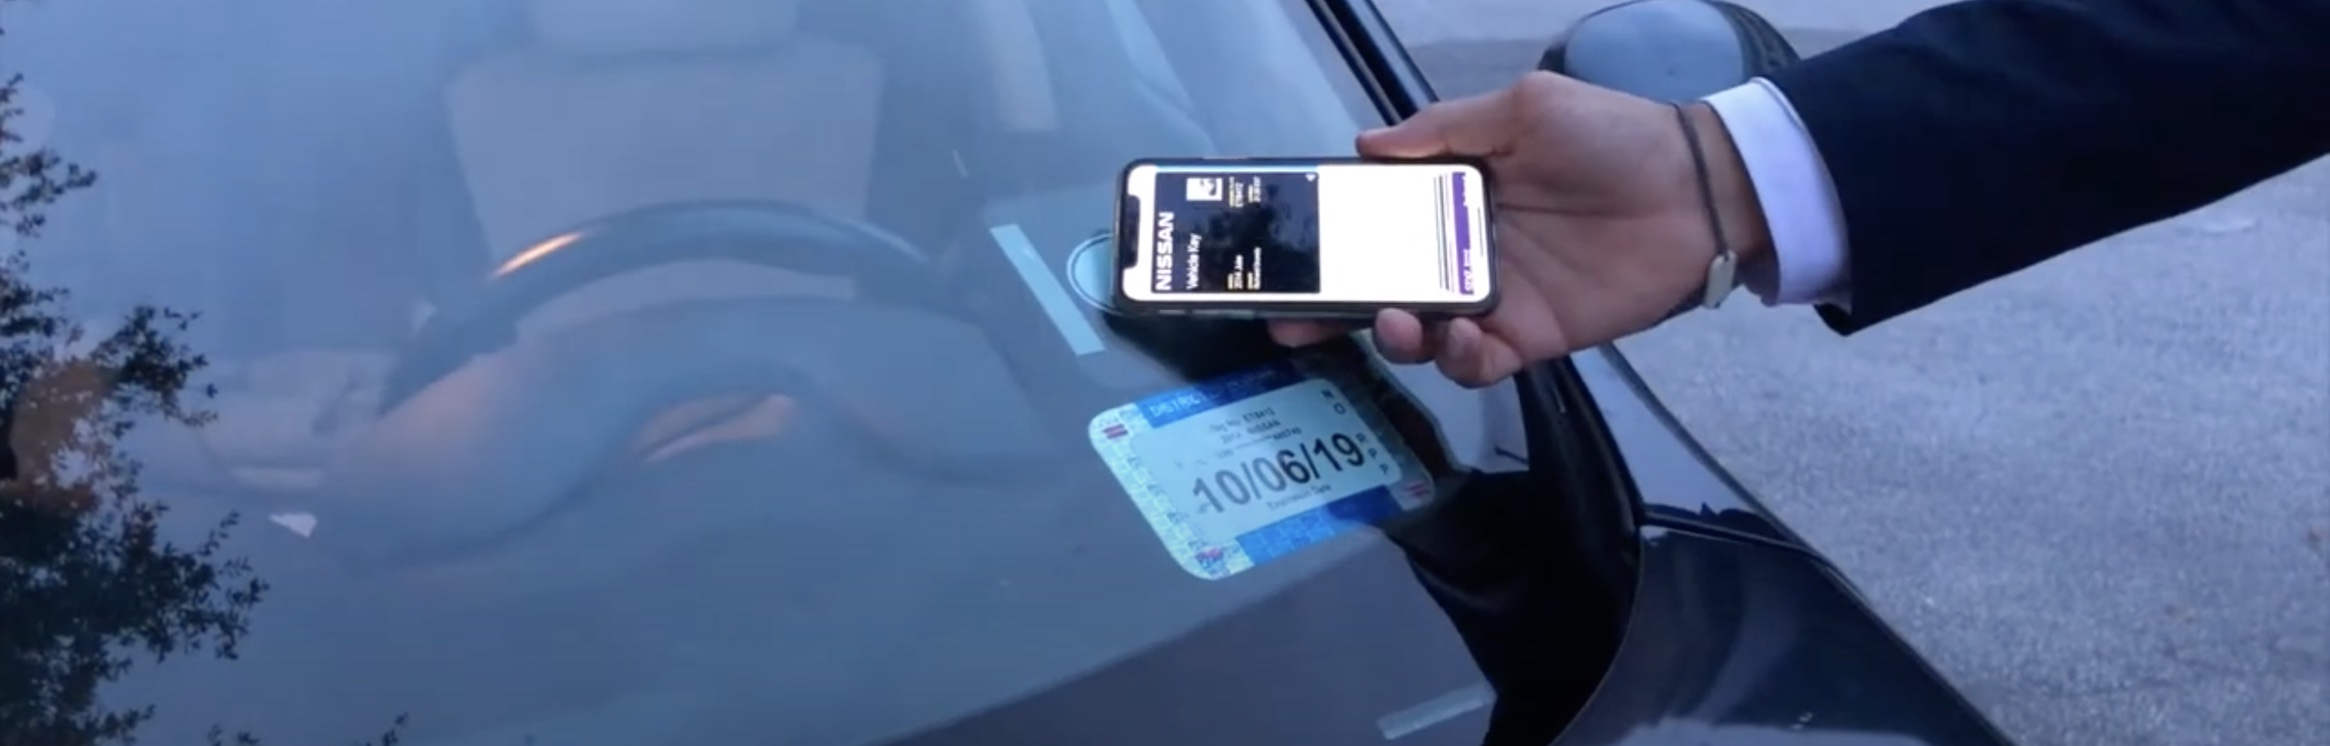
We used double-sided tape to fix the unit onto the windshield but any method (like a back wedge) will work as long as the NFC reader scan surface is as close to the glass as possible. In either case, you can test it out and adjust it to your liking.
Making it simple with PassNinja
Once you have the system working, it can become a pain to manage it. Especially if you're issuing temporary passes to friends, family, valet, rental customers, etc. PassNinja makes this super easy. Just signup for an account and create a pass template for your car. Then from the dashboard, select your pass template and issue a new pass with any NFC message you want:
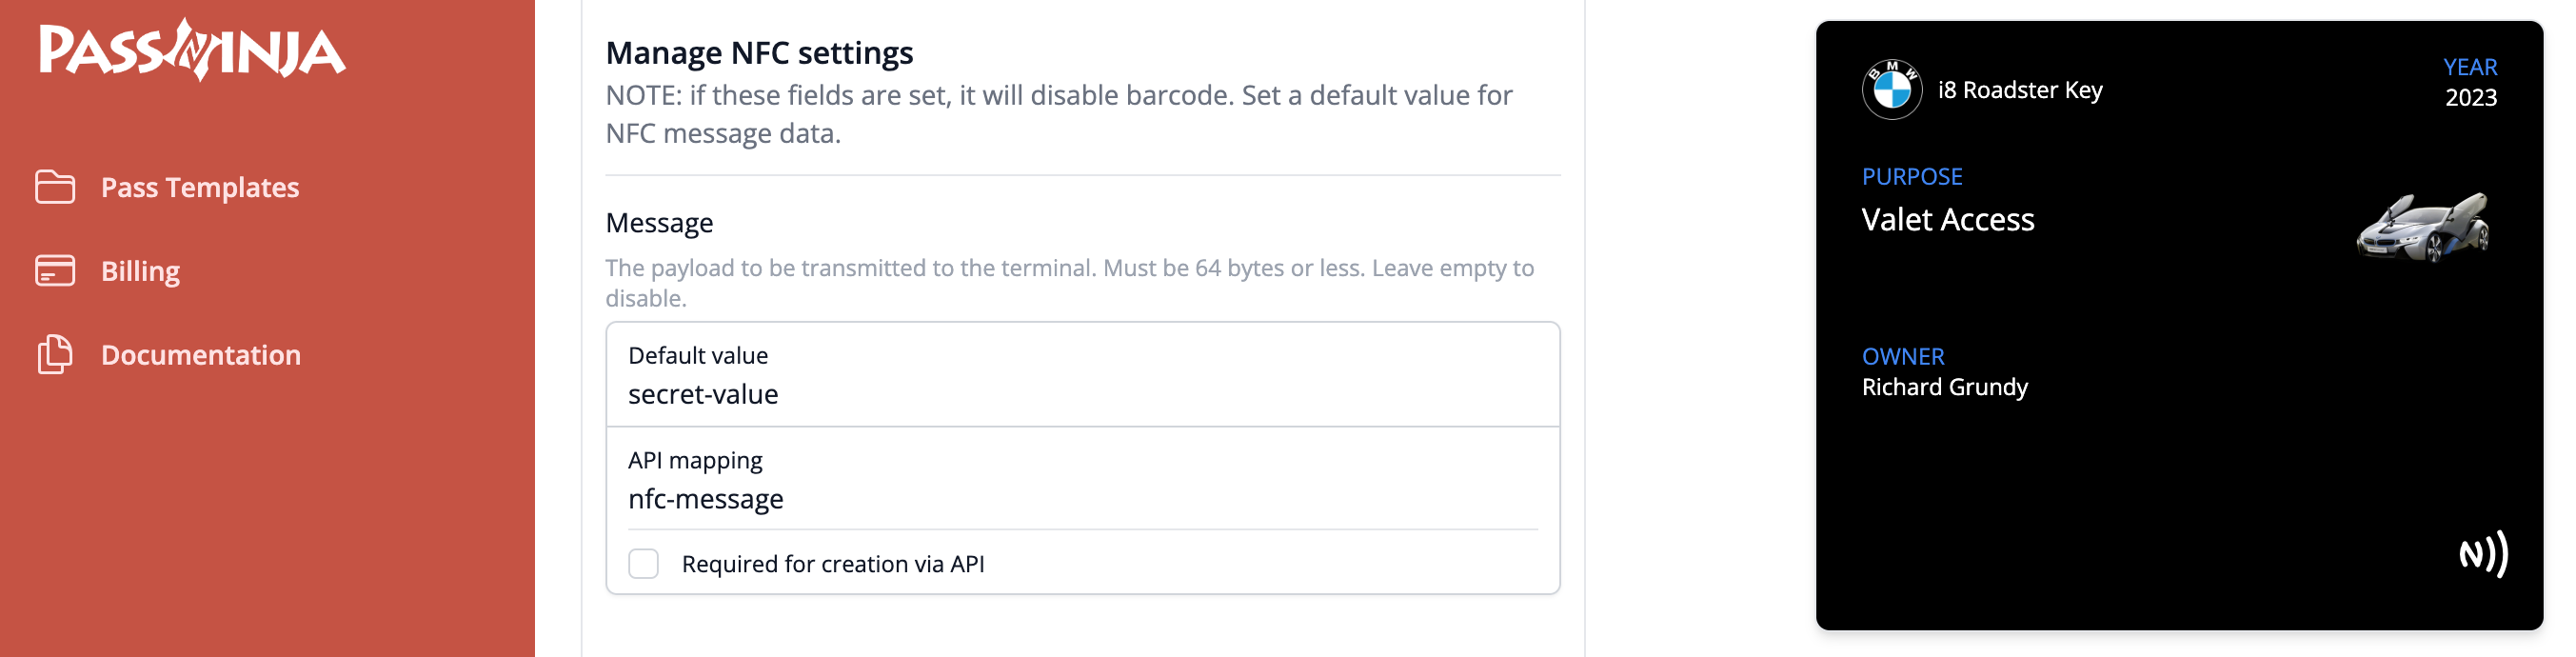
Make sure to add the matching validation check to the script we made before. You can limit access based on time, date, location, whatever! Just add any sensors you need to check against to your Raspberry Pi. PassNinja provides full lifecycle management of wallet passes, so you can push updates to pass data at any time. This includes the ability to revoke passes or reset configurations on your NFC readers in case you lose your phone or watch. Our dashboard tools and software APIs give you direct control over all your issued passes and deployed NFC readers so your access system is always up to date and secure.
Conclusion
In this guide we covered how to setup Apple and Google Wallet passes with NFC to unlock a car. We worked though integrating a car's keyless remote with a Raspberry Pi and NFC reader to validate wallet passes through the windshield. We showed how to put access details into securely signed passes with PassNinja. And finally, we outlined the extensive control we provide to manage and revoke passes. Now you don't have to carry around your car keys, just get going with your NFC phone or watch.
If you have any feedback on this article, let us know!
More articles focused on Hardware
This guide will cover the process of setting up a VAS reader to detect and verify Apple and Googl...
How to configure a Famoco (FX207) Tap&GoThis guide shows exactly how to take Famoco’s VAS sample, make it build cleanly on current Androi...
How to configure a Reyax RYRR30D NFC readerThis guide provides detailed instructions on setting up the Reyax RYRR30D USB-C NFC reader to int...
How to configure a SocketMobile S550 Bluetooth NFC readerThis guide will cover the process of setting up a VAS compatible bluetooth enabled NFC reader to ...
How to Control Any Device with a Relay and Raspberry PiThis guide covers how to control electrical equipment like an appliance or battery-powered device...
How to Control VTAP from Background (MacOSX)The VTAP series of NFC readers from DotOrigin are popular because of their ease of use and broad ...
How to Control VTAP from Background (Windows)The VTAP series of NFC readers from DotOrigin are popular because of their ease of use and broad ...