How to Create Apple Pass Type IDs

Updated January 31, 2026 02:29
Overview
This guide is designed to help developers quickly generate pass types on Apple's Developer portal. A pass type consititutes a unique identifier and a signing certificate. Whether you're a seasoned developer or a beginner, this guide will get you through the steps like a ninja.
We start with creating a pass type identifier for your organization and group of passes you want to distribute. This identifier, in the form of a reverse DNS string, is created in the Identifiers section of your Apple Developer portal. Once you have the pass type id, you'll need a signing certificate to go along with it. You get the signing certificate by creating a certificate signing request (CSR) on your PC and then generating the certificate in the Certificates section of the Apple developer portal.
Once generated, you then can download the signing certificate to your machine for signing a pass bundle.
Create Pass Type ID
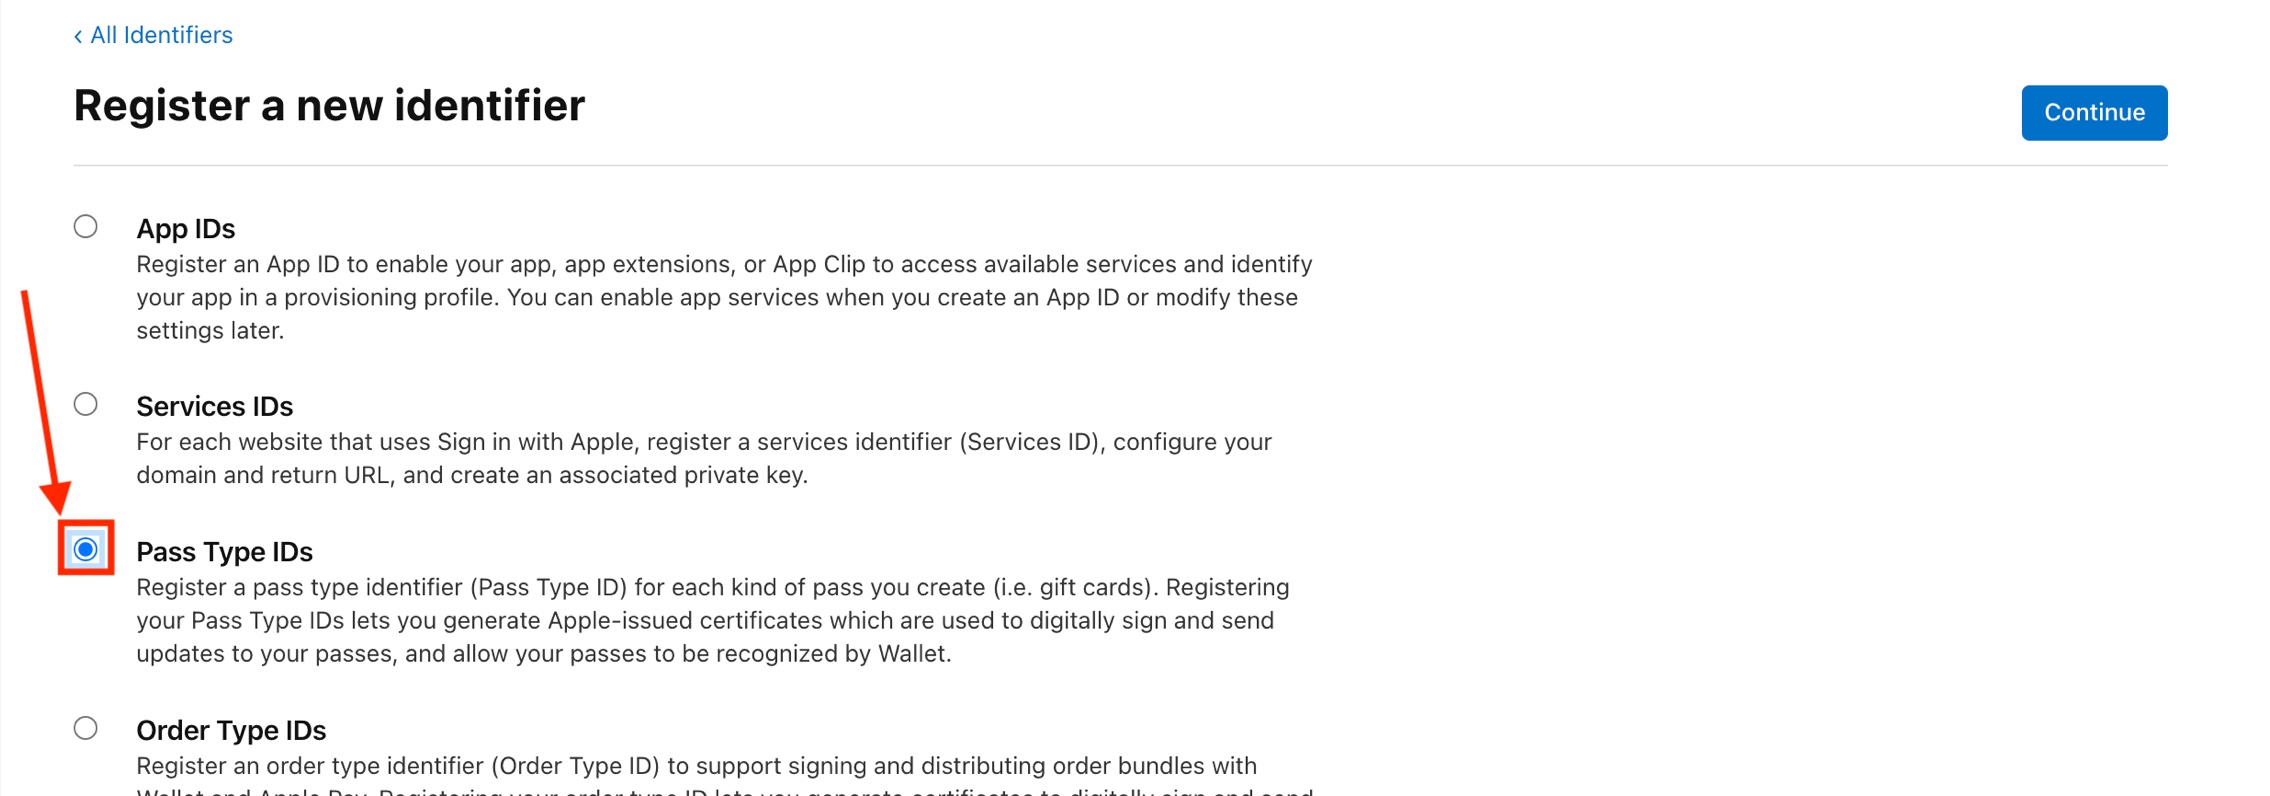
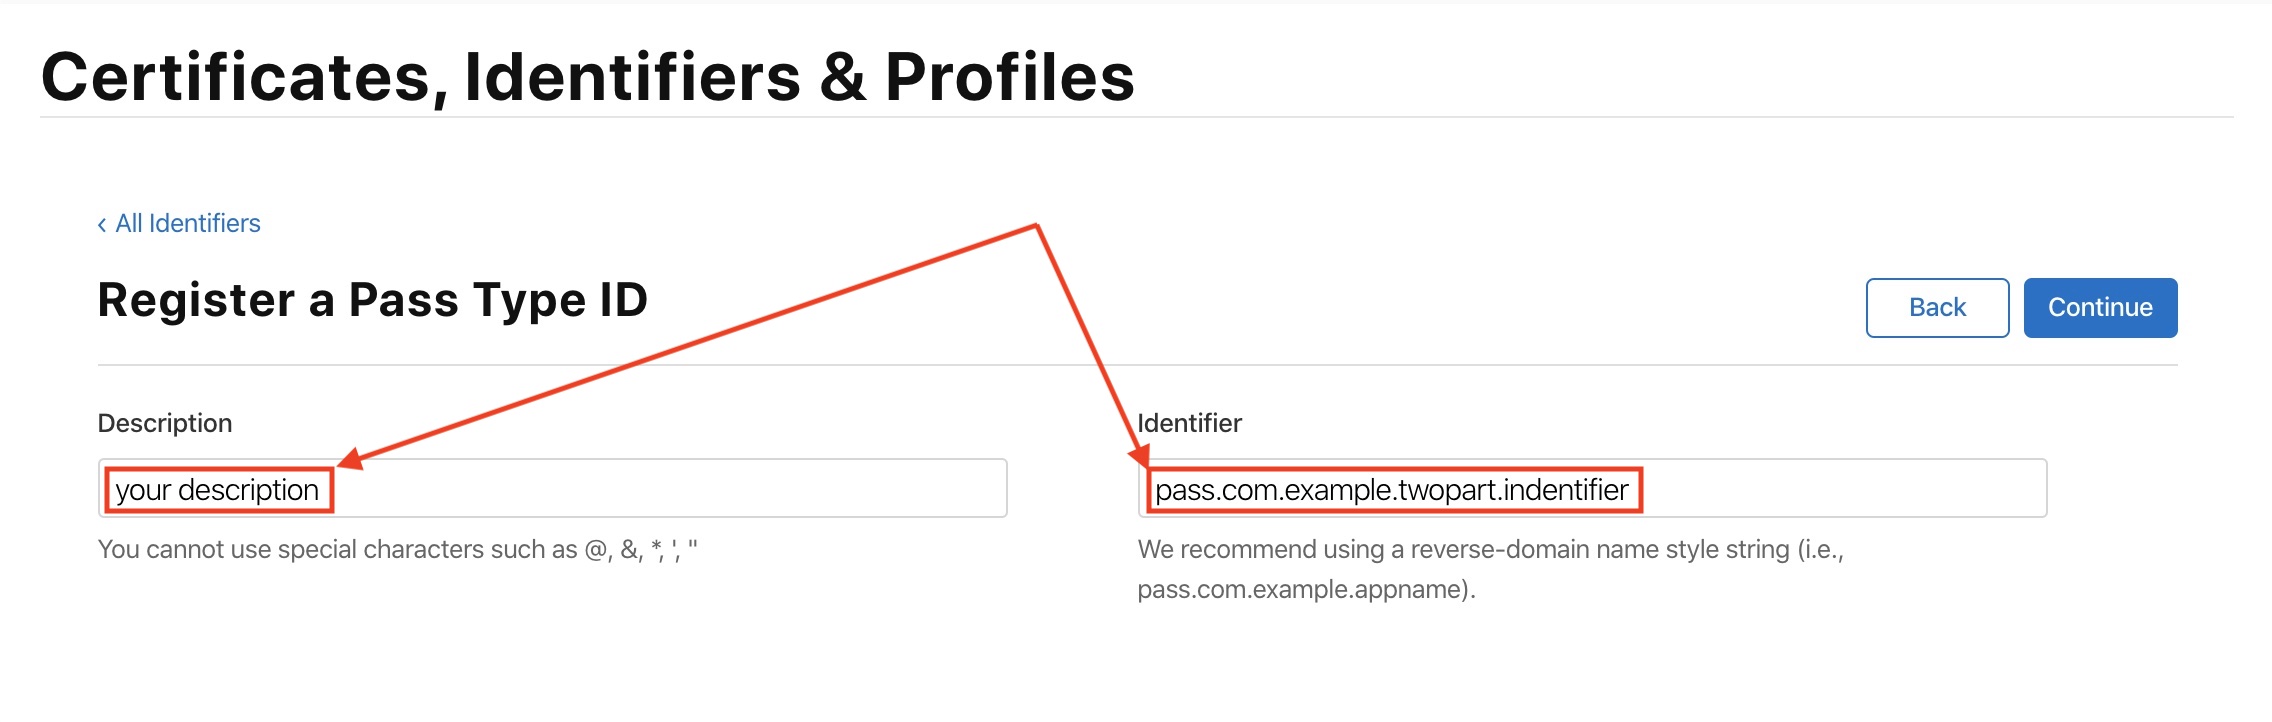
To start you'll need to create a pass type identifier in your Apple Developer account. This is done by filling out a simple form under the Identifiers section. The identifier should be a unique string, without spaces, typically following a reverse DNS pattern so that sorting a list of many identifiers groups them by organization instead of application. For example, something like this:
pass.com.myorg.myapp.mycampaignGo to Apple Developer portal

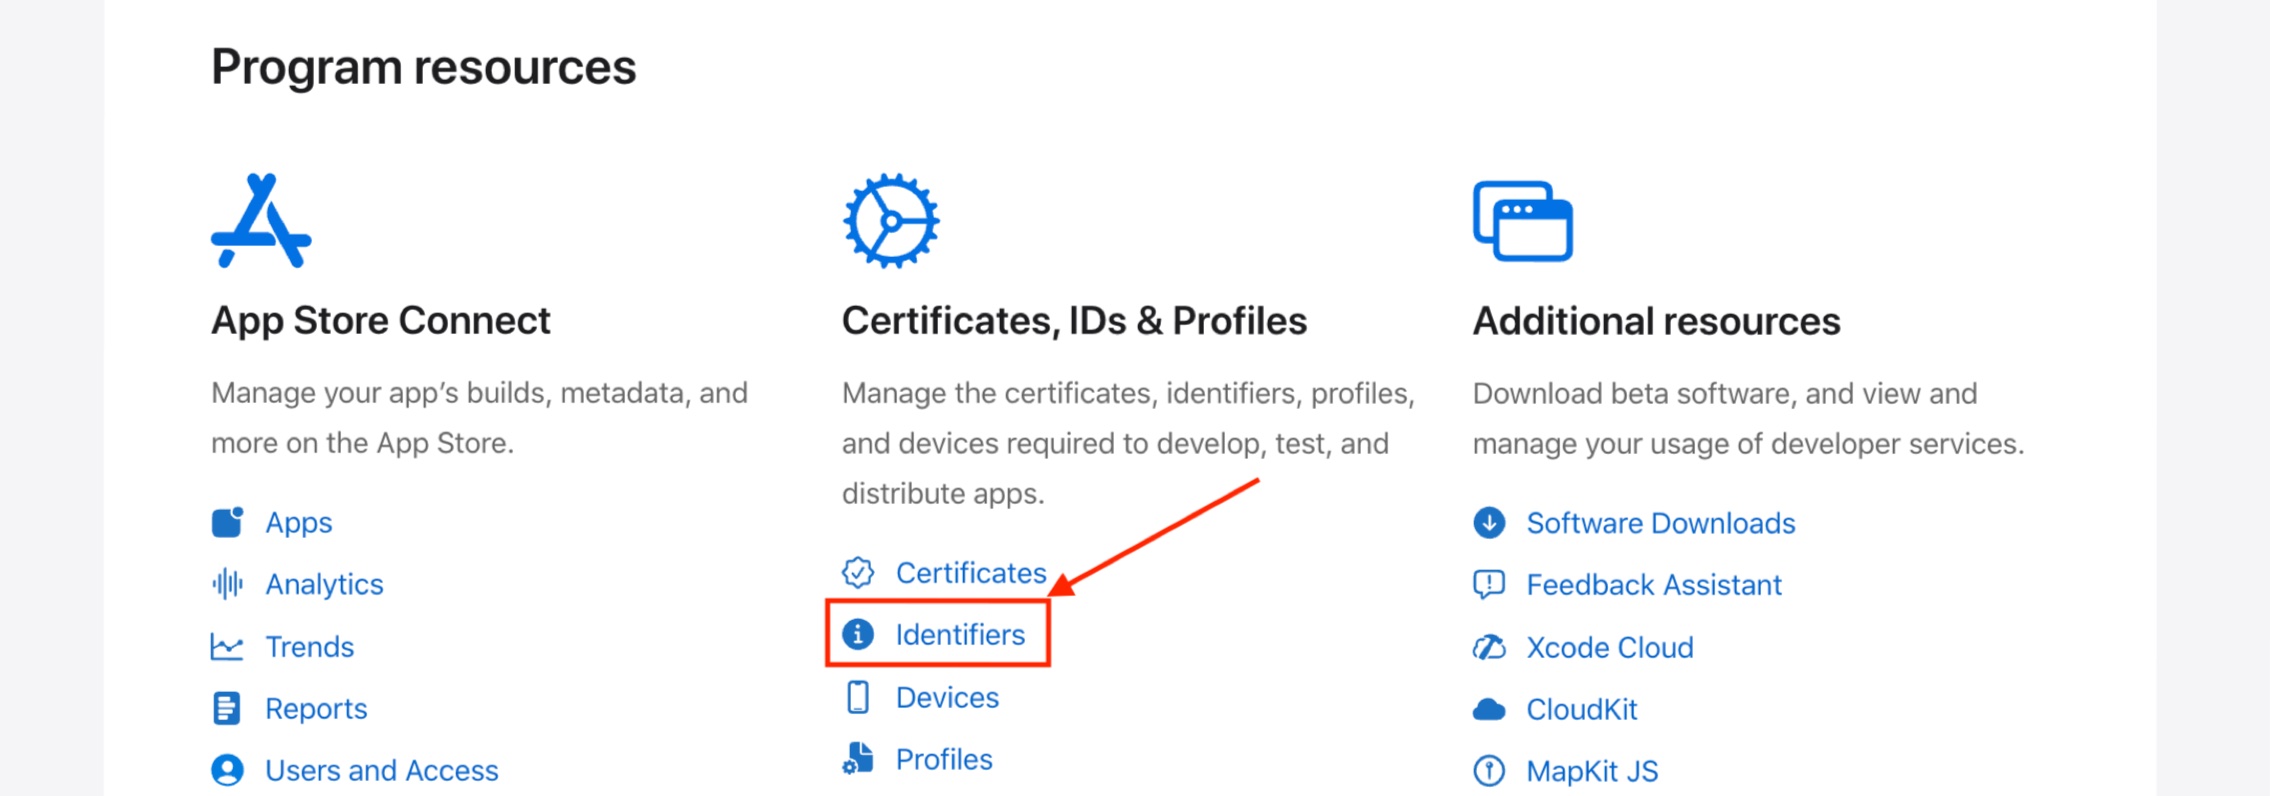
Sign in to your developer account

Select Identifiers and click Add (+)
Create a Pass Type Identifier
Register your Identifier with description
Generate Signing Certificate
Once a pass type identifier is registered on the Apple Developer portal, you'll need a certificate to start using it in making Apple Wallet passes. Similar to how applications (.ipa files) need to be cryptographically signed by their developer before they can be installed on devices, Apple passes (.pkpass files) need to be signed by their issuer before they can be installed in Apple Wallets. So you will need a signing certificate for each pass type identifier you create and these certificates expire every 398 days.
Prepare a Certificate Signing Request
To get a signing certificate from Apple, you need to request it. You do this by creating a Certificate Signing Request using a tool like OpenSSL (Keychain Access on Mac works too!).
openssl req -nodes -newkey rsa:2048 -keyout Private.key -out Request.csr -subj "/C=US/ST=Florida/L=Miami"This will generate two files. Be sure to save both files in a place you remember because you will need the contents of both at different points in the future. You will need the contents of Request.csr in the next step and the contents of Private.key in the future when you want to sign a pkpass package.
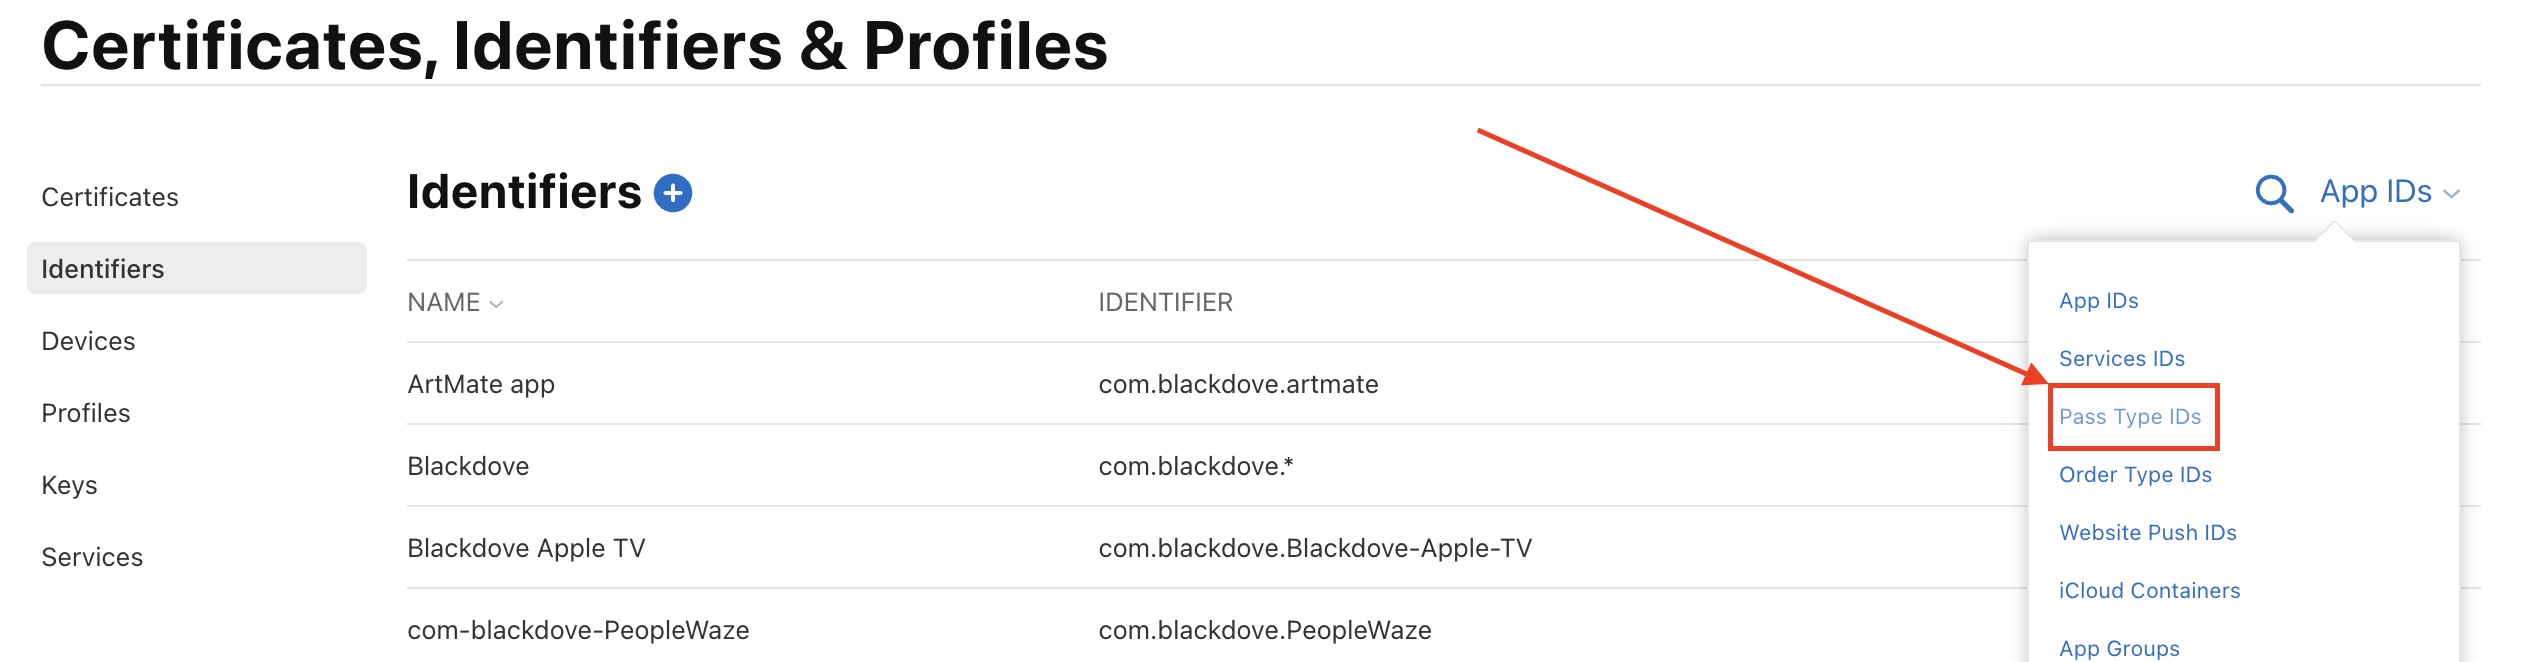
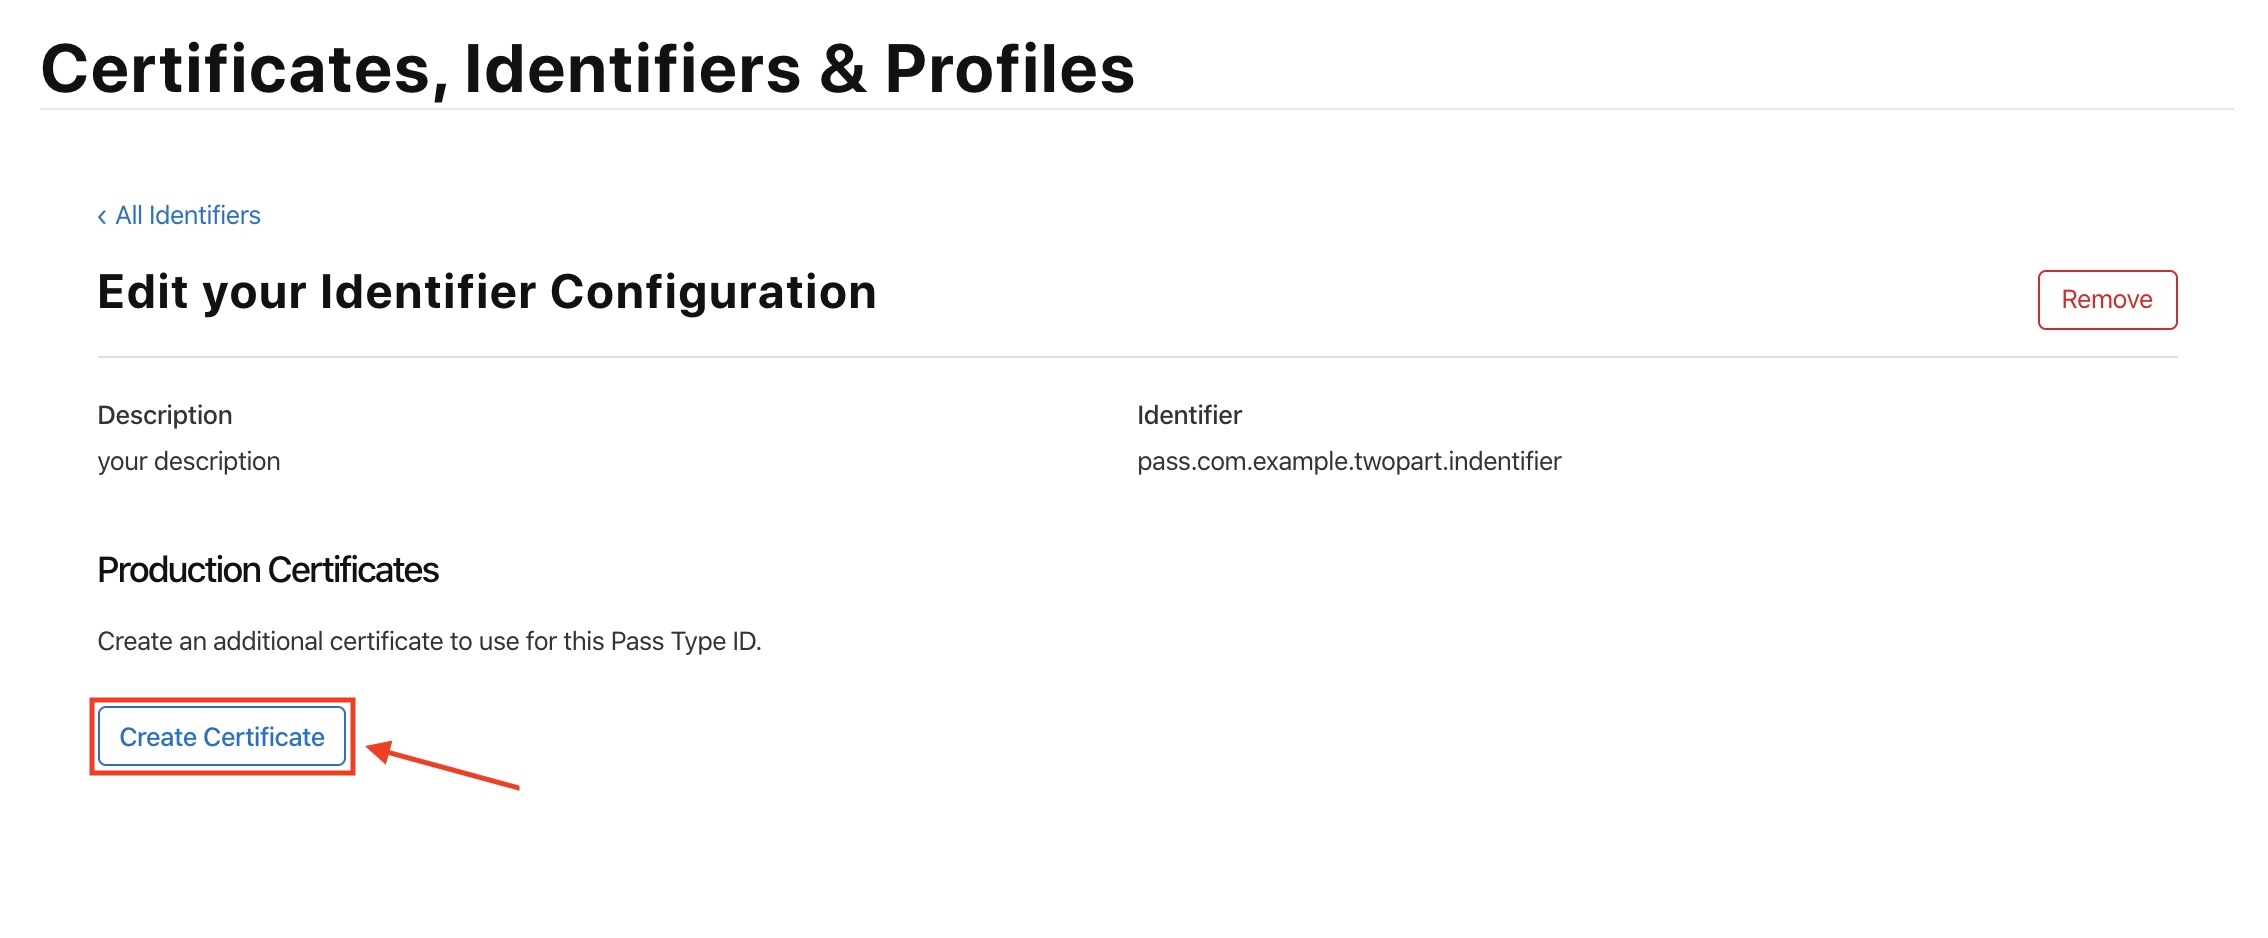
Select your Identifier and click "Create Certificate"
There's a list of all your Pass Type IDs in your apple dev account, when you are on the identifiers page click dropdown from upper right.
When you see the pass type identifier you want to create a certificate for, click on the row in the list. You will be taken to this page, where you can create a certificate by clicking "Create Certificate".
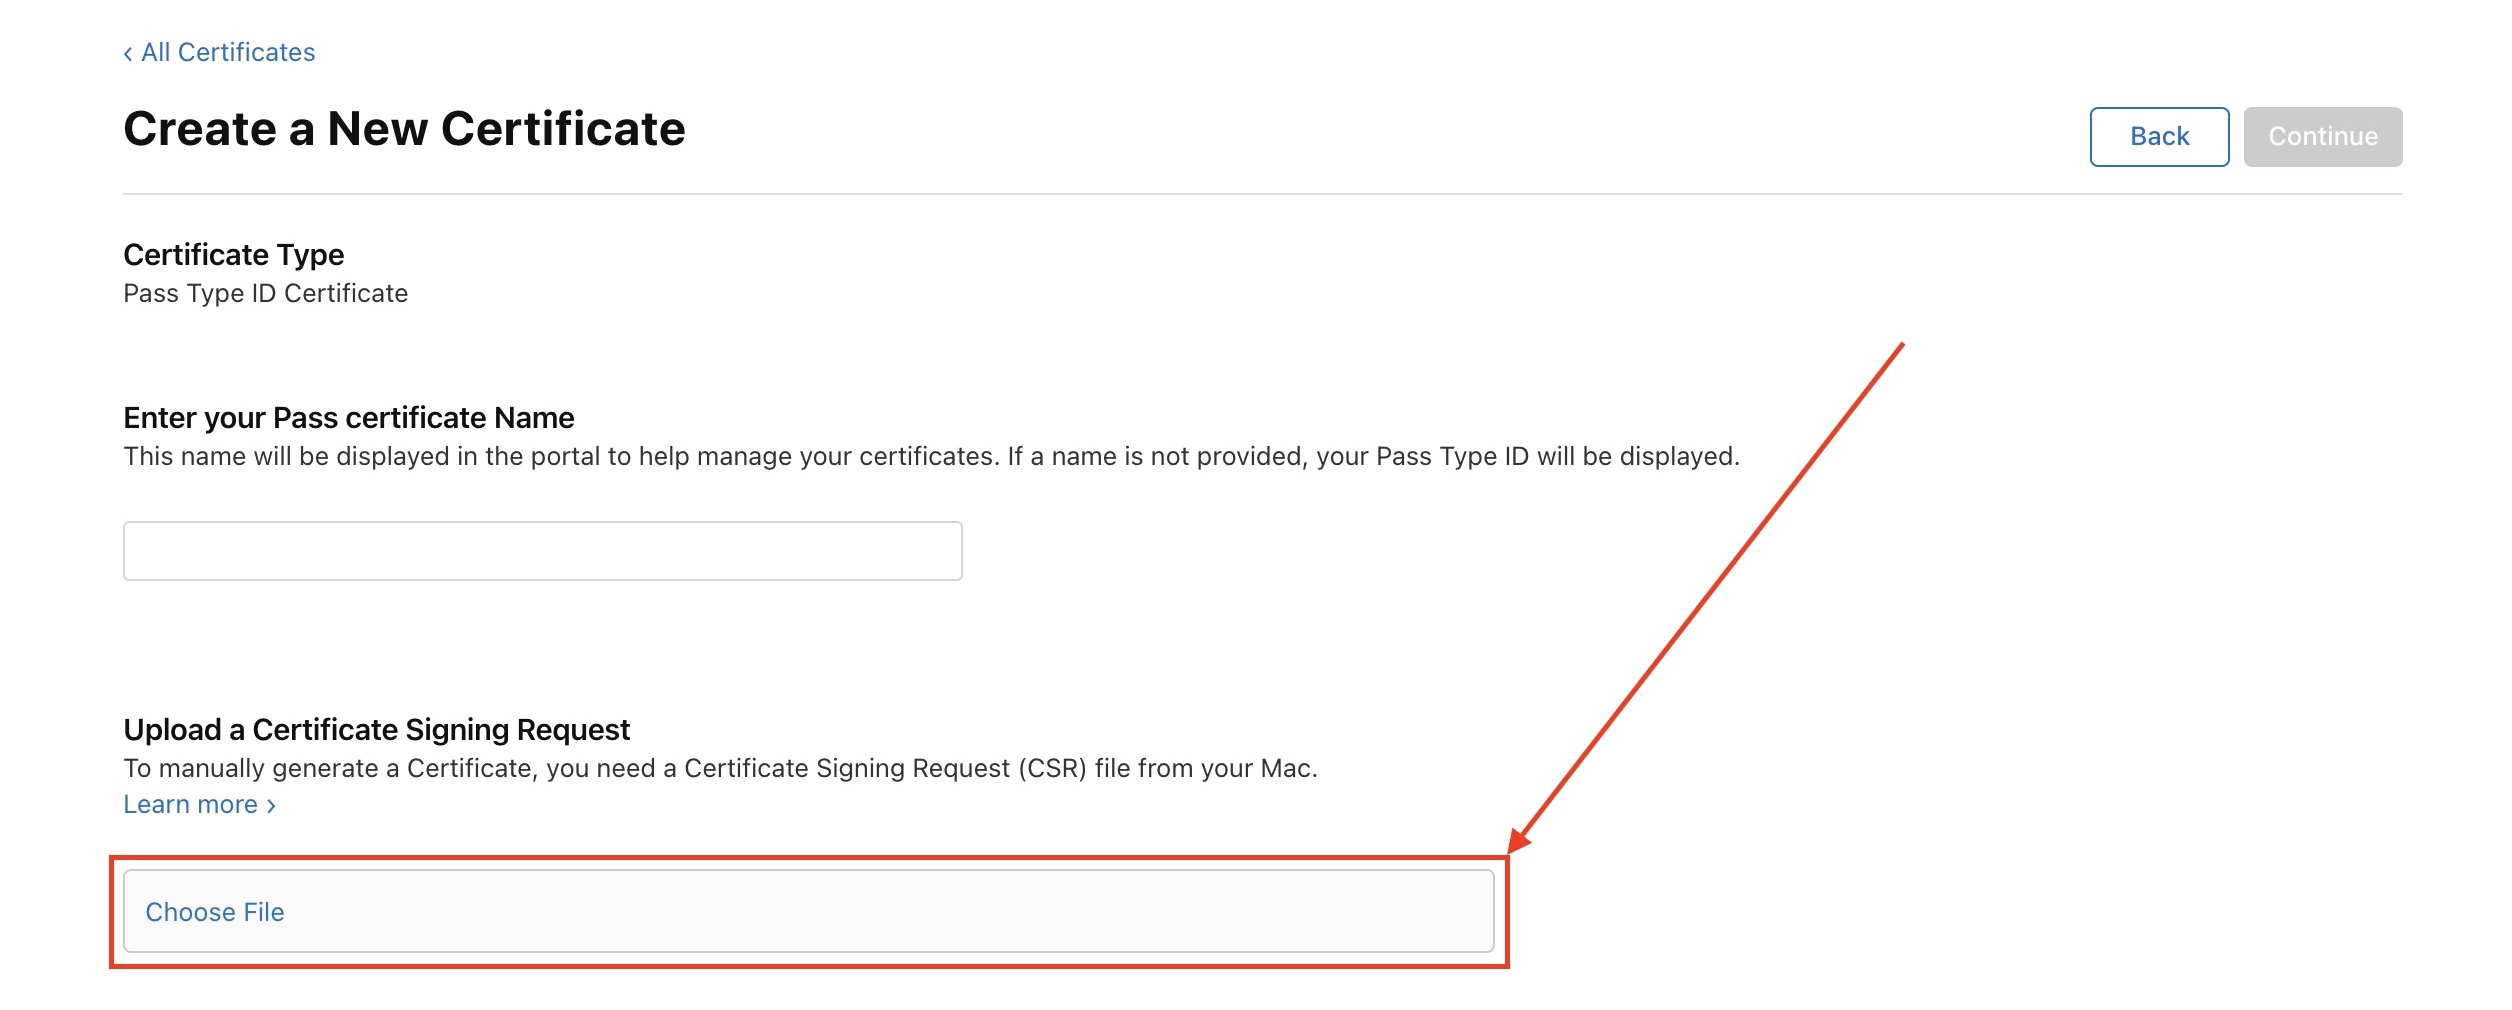
Upload the certificate signing request you created in the previous step to the Apple portal.
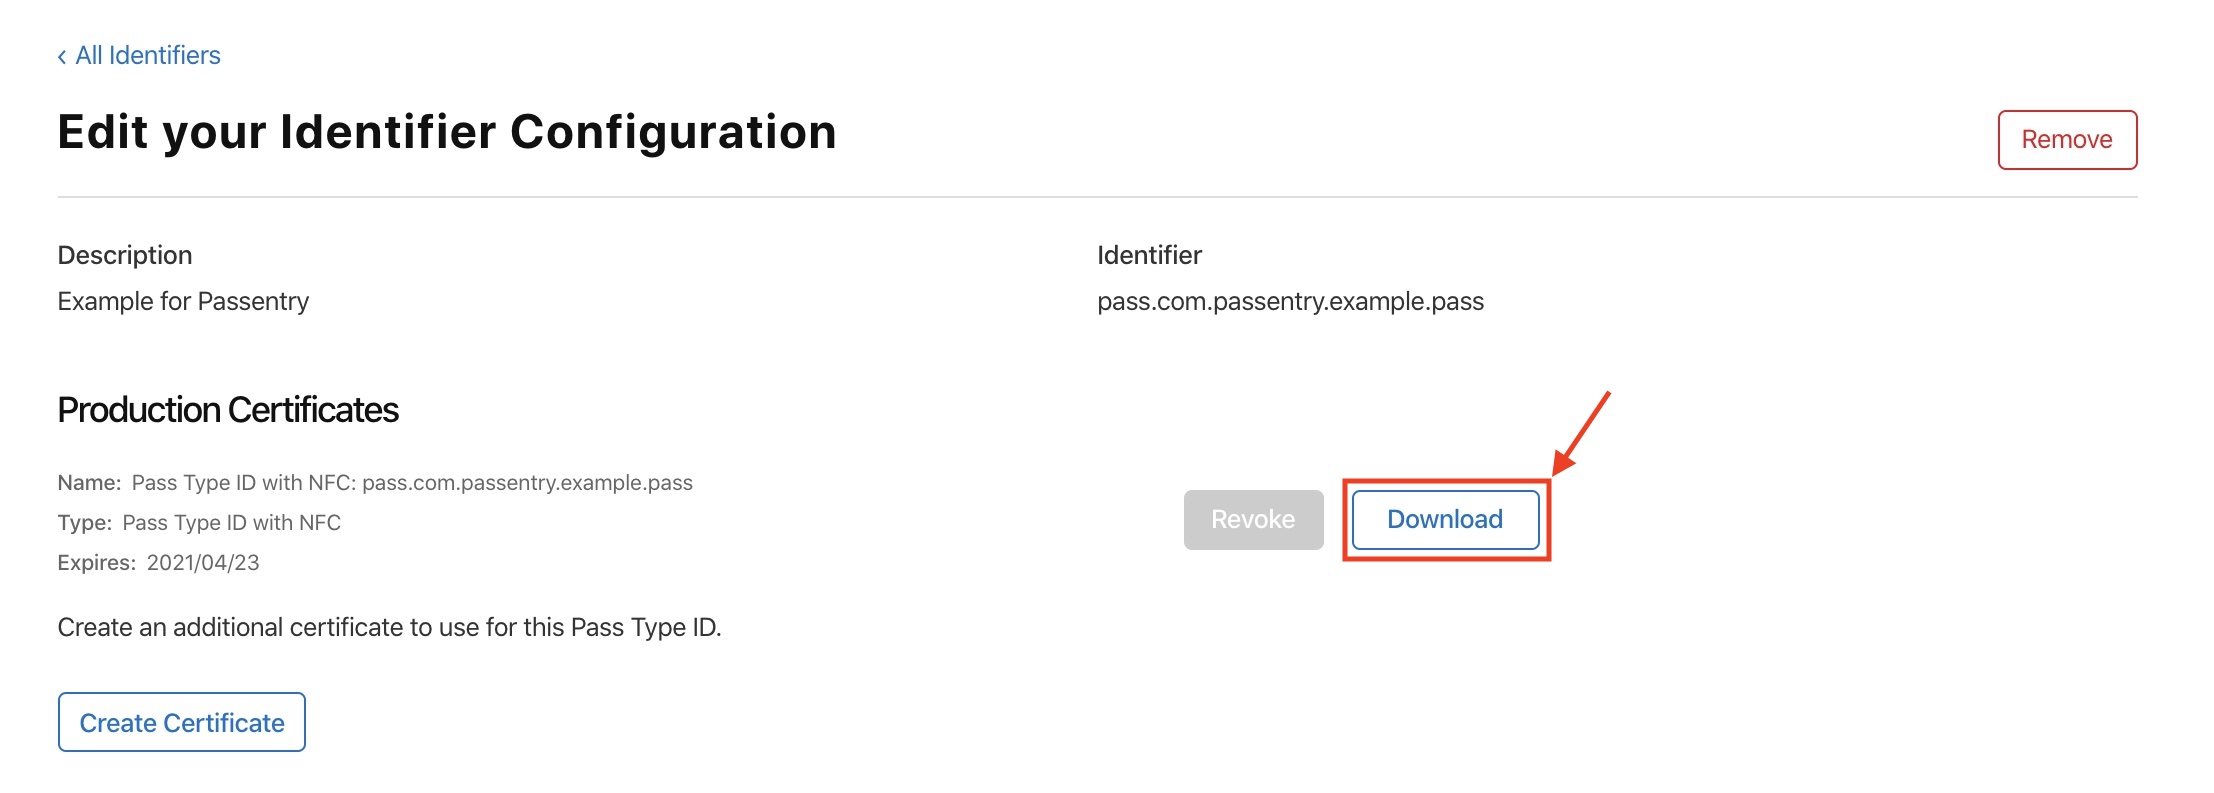
Download the Signing Certificate
Convert the .cer file into .p12
The downloaded pass.cer from Apple is a binary file but in order to sign pass bundles we need it in text format. We are going use OpenSSL to convert the file. Once converted we use our original private key to encrypt it along with a passphrase for extra security. The resulting .p12 will actually be a combined format that holds the private key and certificate!
Note: You can also leave it in pem format for use later if you prefer to keep your private key and certificate separate.
openssl x509 -in pass.cer -inform DER -out pass.pem -outform PEM
openssl pkcs12 -export -inkey Private.key -in pass.pem -out SigningCert.p12
After downloading the .cer file. Double click the .cer to open in your keychain access OSX program.
Right click the certificate and select Export.
That will create a SigningCert.p12 file (name as you wish). Make sure you keep this file handy for when you need to generate passes for Apple Wallet later (they're sometimes called pkpass files).

Note that when using the SigningCert.p12 for signing passes you may be "unable to build chain to self-signed root" for your pass type id. This is likely because your Apple Worldwide Developer Relations certificates are missing or expired in your keychain. You’ll need to download the Worldwide Developer Relations G4 sub CA and install it on your system (double clicking AppleWWDRCAG4.cer works). More details on this Apple post. You can confirm that the correct intermediate certificate is installed by verifying that the expiration date is set to 2030 and the Organization field is set to G4.

Simplest way to avoid certificate management
Creating pass type identifiers and their signing certificates are just the beginning, to issue Apple NFC passes you'll also need to generate encryption keys for each. This all can be a pain when you're trying to turn around new pass campaigns quickly. PassNinja automates this for you so you can streamline your workflow while staying protected against malicious attacks. Let us know if you have questions about how our porducts can get you up and running in record time.
Conclusion
This guide walked you through the steps to create a pass type identifier and it's signing certificate so you can generate NFC passes that your customers can install. It's the first stage of adding secure mobile ID capabilities to your property or project. Next you'll need to start designing a pass template to match your brand language and use case.
If you have any feedback on this article, let us know!
More articles focused on Apple Platform
In this article, we'll go over what happens when you create a pass type ID, issue passes using th...
Create And Deploy A Digital Wallet Pass In 10 Minutes With PassninjaDigital wallet passes are one of the fastest ways to deliver loyalty cards, tickets, or coupons d...
How Does Pass Updating Work On Apple WalletThis tutorial is designed to help developers quickly understand how to make passes in Apple walle...
Error Sorry Your Pass Cannot Be Installed To Passbook At This TimeWhen attempting to install a pass in Apple Wallet, you may encounter an error stating that the pa...
How To Update Apple Passes With The Passninja ApiWith the PassNinja API, Apple Wallet passes can be updated after creation or created as personali...
How To Create Apple Wallet Nfc Encryption KeysThis guide is designed to help developers quickly generate an encryption keys for NFC enabled App...